
| 8. Measuring - Astronomical Quadrant or Sector |
|
| © Science Museum / Science & Society Picture Library |
Here is this activity as published on the Astronomical League observing program page:
"Astrolabes were designed to be hand held and as a result had to be fairly small. The small size limited their precision. An astronomical quadrant or sector could be made much larger. Tycho Brahe was said to have had one that was said to have been 2 meters tall that supposedly allowed measurements in the sub-arcsecond range.
Some quadrants were fixed mounted on walls and as such that they were usually aligned north-south. This enabled them to measure objects only as they transited the meridian. Others were able to rotate, and it was possible to read the azimuth (heading) too. The second type had to have the azimuth scale aligned to the north pole prior to use. The alignment was possibly done by the same methods you used to find north above.
Construct an astronomical quadrant. It doesn’t have to be as large as the one in the picture but try to make it at least one foot on a side so it is significantly larger than your astrolabe. It should be noted that an astrolabe is self leveling while a quadrant is not. Make sure to level your quadrant prior to using it.
Practice using your quadrant by measuring the height of Polaris, the elevation of a few bright stars as they cross the meridian at night (transit), and by measuring the altitude and azimuth of the moon and planets. Record the dates and times along with your observations. Compare the use and results from your work with an astrolabe and quadrant. Do you have a preference? Does one seem easier to use? Does one give better data? It is interesting to know that Kepler used data from one of Brahe’s quadrants to get the data to verify his three laws of planetary motion."
Sunday December 23, 2018
A Hand Held quadrant. Measuring Sun
and Moon angles, determining latitude. Checking the true north-south line
against the pole star Polaris.
Measuring the sun angle at noon on 12-23-2018, a few
days past Solstice
Here is a simple
astrolabe which I constructed with materials which I had on hand. No out of
pocket expenses, unlike most of my astronomical ventures. This is just a
starter. I want to build a quadrant. I want to build a wall.
And it's not going to cost seven billion dollars.
An astrolabe can range from simple to extremely
complex, but they all essentially perform the same task: measuring the elevation
of a celestial object above the horizon.
I followed the instructions for "How to Make and Use a
Mariner's Quadrant" at
https://hubpages.com/education/Fun-Math-Activities-with-Measurement-Science-and-History
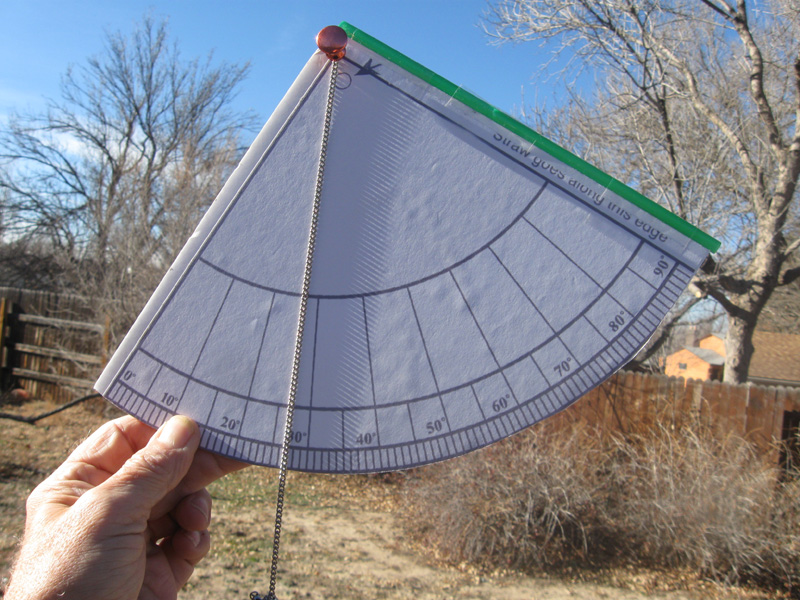
. I printed out the quadrant pattern and secured it with spray adhesive to a
piece of foamboard. The plumb is secured to the centerpoint of the quadrant with
a large tack and a jewelry chain. A soda straw taped to the top edge serves as
an aiming device. Site down the straw and the suspended chain crosses the scale
at the elevation. A word of advice: If you use this exact pattern,
the pivot hole is marked badly. In the photo you can see the printed arrow
indicating where they suggest you make the pivot hole. It should be
exactly at the intersection of the 0 and 90 degree radians.
You can safely use the device to measure the elevation
of the Sun as shown in the photo above. Start by approximately aiming the soda
straw at the Sun. I gotta say it: NEVER LOOK DIRECTLY INTO THE SUN. Adjust the
quadrant so the shadow cast by the large tack lines up with the 90 degree line
on the chart. The chain will now mark the welevation of the Sun above the
horizon. The photo was taken at solar noon on Sunday December 23, 2018. This is
just two days past the Winter Solstice. I measured the Sun angle as 27 degrees
above the horizon from my backyard latitude of about 40 degrees north.
Stellarium data for that date, time and locations shows 26 degrees 52'45".
Not bad for soda straws and glue.
I say "about" 40 degrees. I'm only a few mouse clicks
away from finding the latitude of my backyard to five decimal precision, but
that's not what this program is about. I was out that morning just past midnight
to measure the elevation of the full Moon at its meridian transit. The December
full Moon was actually about 24 ours earlier, but at 99.5% illumination and neck
stretching elevation, this was close enough for my purposes. The soda straw site
worked perfectly for the bright Moon and I was able to record an elevation of 72
degrees. Stellarium shows 73 degrees 04'.
These will be the initial two
readings on my voluntary activity,
Orbital Tilts.
Getting a reading on Polaris was a different matter.
Try as I might, I couldn't get the star to line up through the narrow soda
straw. A lined along the straw as best as I could and got an elevation of 41
degrees. The elevation of Polaris above the horizon corresponds the latitude of
the observer. This is how I knew my latitude was "about" 40 degrees. Early
sailors had this knowledge and used quadrants. If they knew the latitude of
their destination, they could sail to that latitude and go east or west along
the parallel to their goal. Determining longitude is a whole other matter.
While I was out I attempted to check the alignment of
the true north-south line I had laid out the day before. I would do this by
checking the alignment against Polaris. Even in the light of the full Moon it
was too difficult to pick out the fluorescent pink marker flags. I will try this again after I establish a more
accurate north-south line. I plan to mark the line with white cord which should
be more visible in the dark.
There are several shortcomings to the quadrant at this
point. The soda straw site works fine for the Moon, but it is not practical for
dim stellar objects. I think an open site similar to a basic rifle site would
work better. The pendulum chain I used was just something I had on hand, but it
is far too broad for precise measurements, nearly the width of a full degree on
the scale. The oversize thumbtack that I used for the center pivot casts too
broad a shadow for precise solar elevation measurements. These modifications
should improve the precision and accuracy of this simple device.
March 27, 2019 -- Mural quadrant preliminary sketches
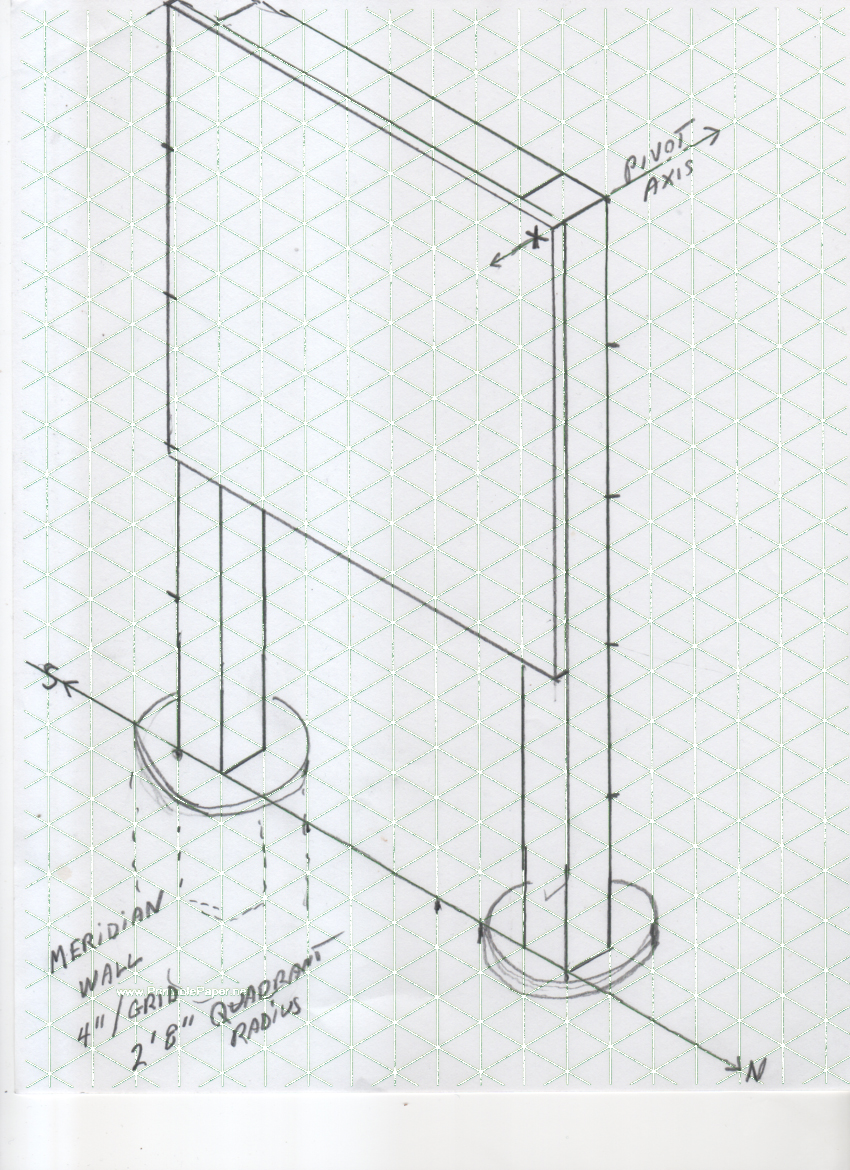
A little ambitious, I was going for a 4' x 4' wall on 4" x 4" posts sunk in concrete. I'm not certain I want to make this kind of infrastructure investment in a suburban backyard with a naked eye limiting magnitude of maybe 3.5 on a good night.
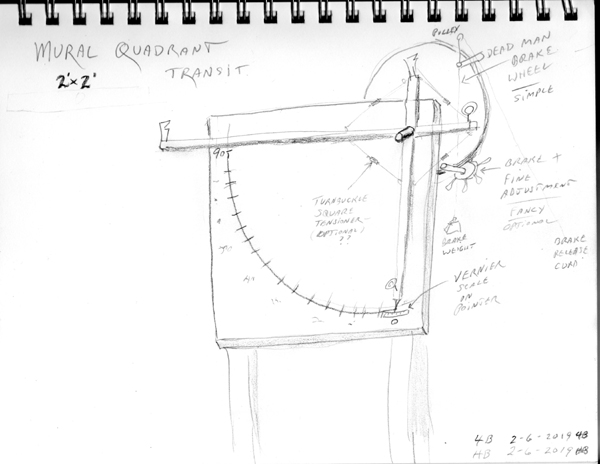
I can go 2' x 2' on 2" x 4" posts and still get a nice 22" radius. I've been pondering some sort of braking system to lock the reading pointer in place. Instead of clamping down the pointer, I'm going to try locking the pivot axle. I'll run the axle through the wall and post, locking it into a circular wooden disk. A "dead man" brake on the wheel...open the brake, line up your object, release to close the brake and lock the wheel in place while you take the reading. If the brake were a rotating cylinder it could be used to fine tune the site.
A 22" radius would yield nearly a full centimeter of arc per degree, easily divided into ten mm. One tenth degree precision is six minutes. This could concievably be improved further with the addition of a vernier scale.